Option Management
Overview
Options define a set of predefined values used for the value range of CI attributes, ensuring data consistency and standardization.
Key Concepts:
- Option: A named set of values (e.g.,
Install Type,Service Status) used to constrain the selectable values for an attribute - Option Value: Each specific value within an option, consisting of a Value (unique identifier) and a Display Name (shown in the interface)
- Attribute Reference: Select the
Optiontype and specify the option to use in a CI type's attribute definition; when filling in the CI, values can only be selected from the referenced option's values
Example:
- The option
Install Typecontains three values:Standalone/Cluster/Active-Standby - In the CI type
Application, the attributeDeployment ModereferencesInstall Type - When filling in
Deployment Modefor a CI, you can only select fromStandalone/Cluster/Active-Standby
What this module can do for you:
- View system predefined options (e.g.,
Install Type,Service Status, etc.) - Create custom options
- Edit or delete custom options
- Import and export option definitions
Interface Layout
The Option Management page uses a list + detail two-tier structure: the list page displays all options in a table, and clicking any row opens an independent detail page for viewing and editing.
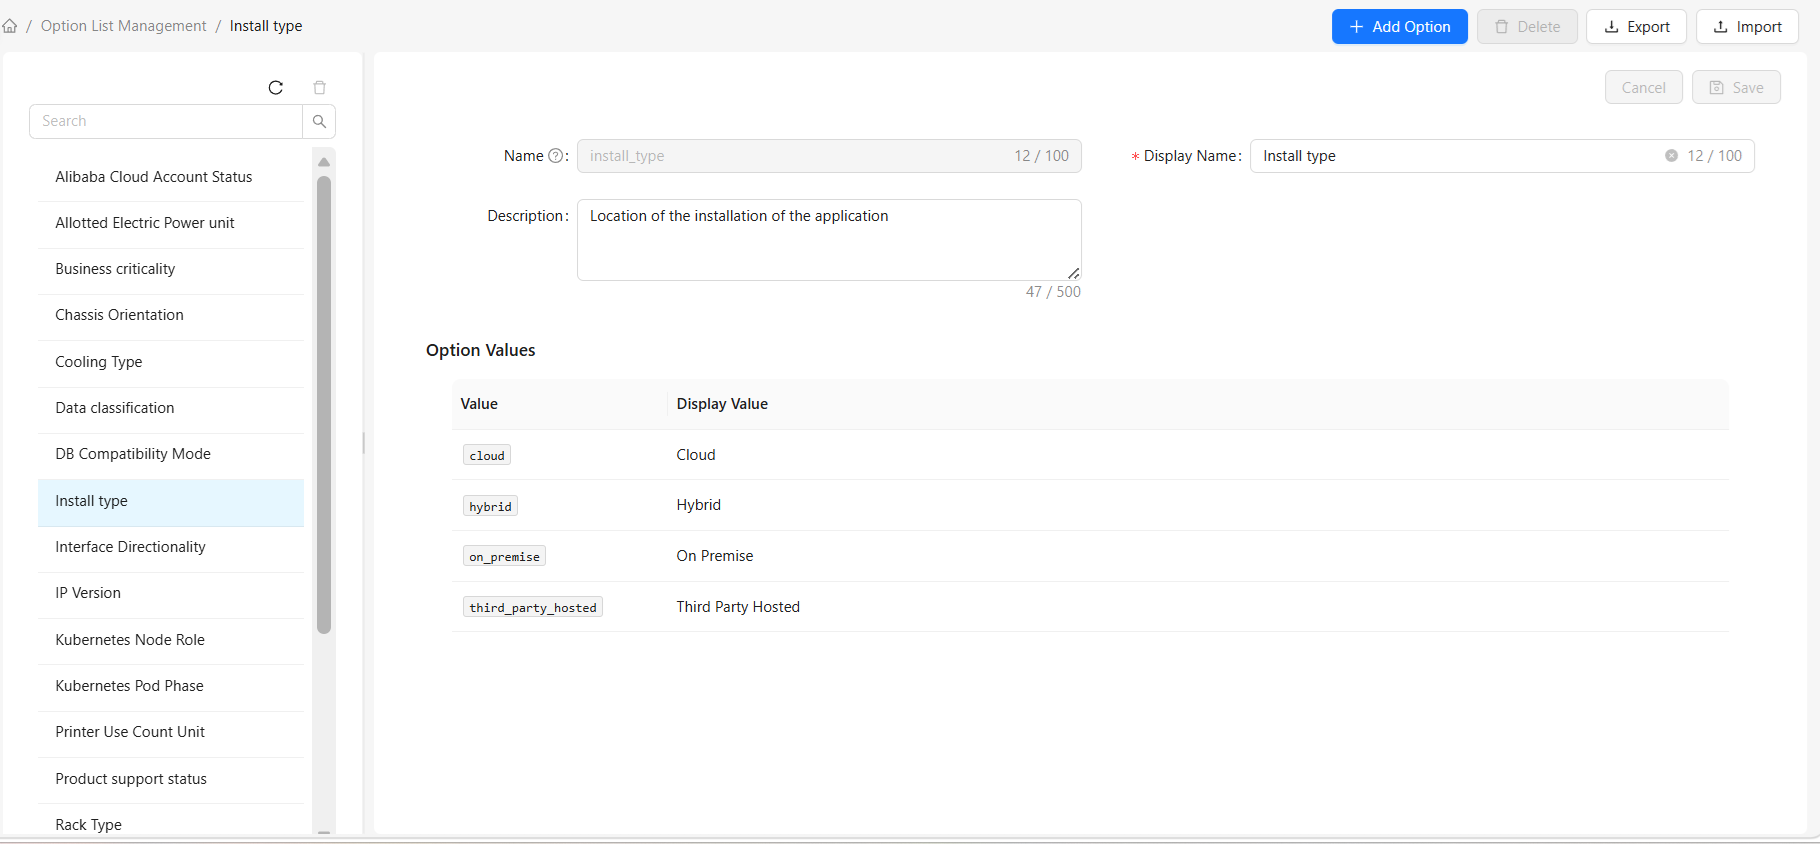
List Page Fields
| Column | Description |
|---|---|
| Display Name | The translated display name for the current language (e.g., Install Type); falls back to the English display name when no translation exists |
| Name | The unique identifier of the option (e.g., install_type) |
| Description | The translated description for the current language |
| Type | Label: blue "Built-in" indicates system predefined; gray "Custom" indicates user-created |
Toolbar Buttons
| Button | Description | Action |
|---|---|---|
| Add Option | Create a new option | Click to open the creation dialog; saves immediately after filling in |
| Delete (batch) | Batch delete selected options | Enabled after selecting at least one row; built-in options are automatically skipped |
| Export | Export selected options as JSON | Enabled after selecting at least one row; supports multi-select export |
| Import | Import options from a JSON file | Click to open the import dialog; supports "overwrite existing" option |
Row Actions
| Action | Description |
|---|---|
| Click row | Opens the option detail page (where you can edit display name, description, and manage option values) |
| Delete (inline) | Delete the option; built-in options cannot be deleted |
How to Use
View Options
- Browse all options directly on the list page (name, display name, description, built-in/custom)
- Click any row to open the detail page for complete information
Search Options
Use the search box above the list page:
- Enter the option name in the search box
- The list automatically filters to show only matching options
- Clear the search box to restore all options
Create a New Option
- Click the "Add Option" button in the list page toolbar
- Fill in the option information in the popup dialog:
- Name: Unique identifier for the option (must start with a letter; only letters, numbers, and underscores allowed; max 100 characters)
- Display Name: Display name for the option (max 100 characters)
- Description: Description of the option's purpose (optional, max 500 characters)
- Click "Save" to complete creation
Edit an Option
- Click the option to edit on the list page to open the detail page
- Modify the Display Name or Description in the detail page (Name is the unique identifier and cannot be modified)
- Click the "Save" button in the detail page to submit changes
Delete an Option
Single deletion:
- Find the custom option to delete on the list page
- Click the "Delete" button on that row
- Click "OK" in the confirmation dialog
Batch deletion:
- Check multiple custom options to delete on the list page
- Click the "Delete" button in the toolbar
- Click "OK" in the confirmation dialog (if any built-in options are selected, they will be automatically skipped with a notice)
- Only custom options can be deleted. The "Delete" button is disabled for built-in options, and they are automatically skipped during batch deletion
- If a CI type attribute is already referencing the option, it cannot be deleted (the system will reject and notify)
Export Options
- Check the options to export on the list page (supports multi-select)
- Click the "Export" icon button in the toolbar
- The system downloads each option definition as a separate JSON file
Import Options
- Click the "Import" icon button in the list page toolbar
- In the popup dialog, click the upload area and select the JSON file to import (only
.jsonfiles accepted, max 1 file) - To overwrite existing options, check the "Overwrite existing options" checkbox
- Click "Confirm Import" to complete the operation
Option Value Management
Each option contains a set of predefined option values. Option values are managed on the option detail page: the upper half of the detail page edits the option's basic information (display name, description), and the lower half displays and manages all option values for that option.
Add an Option Value
- Click the "Add Value" button in the "Option Values" area of the option detail page
- Fill in the option value in the popup dialog:
- Value: Unique identifier for the option value (must start with a letter; only letters, numbers, and underscores allowed)
- Display Name: Display name for the option value in the interface
- Click "OK" to complete the addition
- Click the "Save" button in the detail page to save changes
Edit and Delete Option Values
You can edit and delete option values using the action column in the option value list.
- Option values of built-in options cannot be modified or deleted
- After deleting an option value, CI data using that value may display incorrectly — proceed with caution
Drag-and-Drop Sorting
The option value list is arranged by display order. You can adjust the order by dragging within the detail page:
- Hover over the drag handle on an option value row
- Hold the left mouse button and drag to the target position
- Release the mouse to complete the sorting
- Click the "Save" button to save changes
Sorting determines the display order of option values in dropdown lists. Placing the most commonly used option values first can improve selection efficiency.
Frequently Asked Questions
Q: What is the relationship between options and CI type attributes?
A:
- Option: Defines a set of selectable values, managed centrally in this module
- Attribute: Defined on a CI type; when the type is
Option, it references an option from this module. When filling in a CI, values can only be selected from the referenced option's values
Q: Why is the "Delete" button grayed out for some options?
A: The "Delete" button is disabled for built-in options; only user-created custom options can be deleted. During batch deletion, if any built-in options are selected, they will be automatically skipped with a notice.
Q: Will deleting an option affect existing data?
A: Before deletion, the system checks whether any CI type attributes are referencing the option. If so, the deletion will be rejected with a notification. Please remove all attributes that reference the option before deleting.