CI Directory
Overview
CI Directory is the core module for browsing and managing Configuration Items (CIs) in CMDB. Through the CI type tree on the left, you can quickly locate and view CI instances of specific types.
What this module can do for you:
- Browse all CI instances by CI type
- View CI details, configuration topology, component resources, and change history
- Create new CI instances (including multi-step creation with mandatory dependencies)
- Export the current CI instance list
- Create CIs associated with the current CI
Key Features
- CI Type Tree: The left panel displays the hierarchy of all CI types, supporting search and expand/collapse
- Hide Empty Types: Optionally hide types with no CI instances
- Dynamic CI Attribute Display: Automatically selects the attributes shown in the list based on the selected CI type
- Multi-tab Detail Page: View CIs from four dimensions: Details, Configuration Topology, Component Resources, and Change History
- Advanced Filtering: Supports complex filter conditions and query configurations
- CI Operations: Supports batch deletion, export current list, create CI, and create related CI
- Persistent Settings: Table column settings, density, page size, and more are automatically saved to local storage
Interface Layout
The CI Directory page uses a left-right split layout:
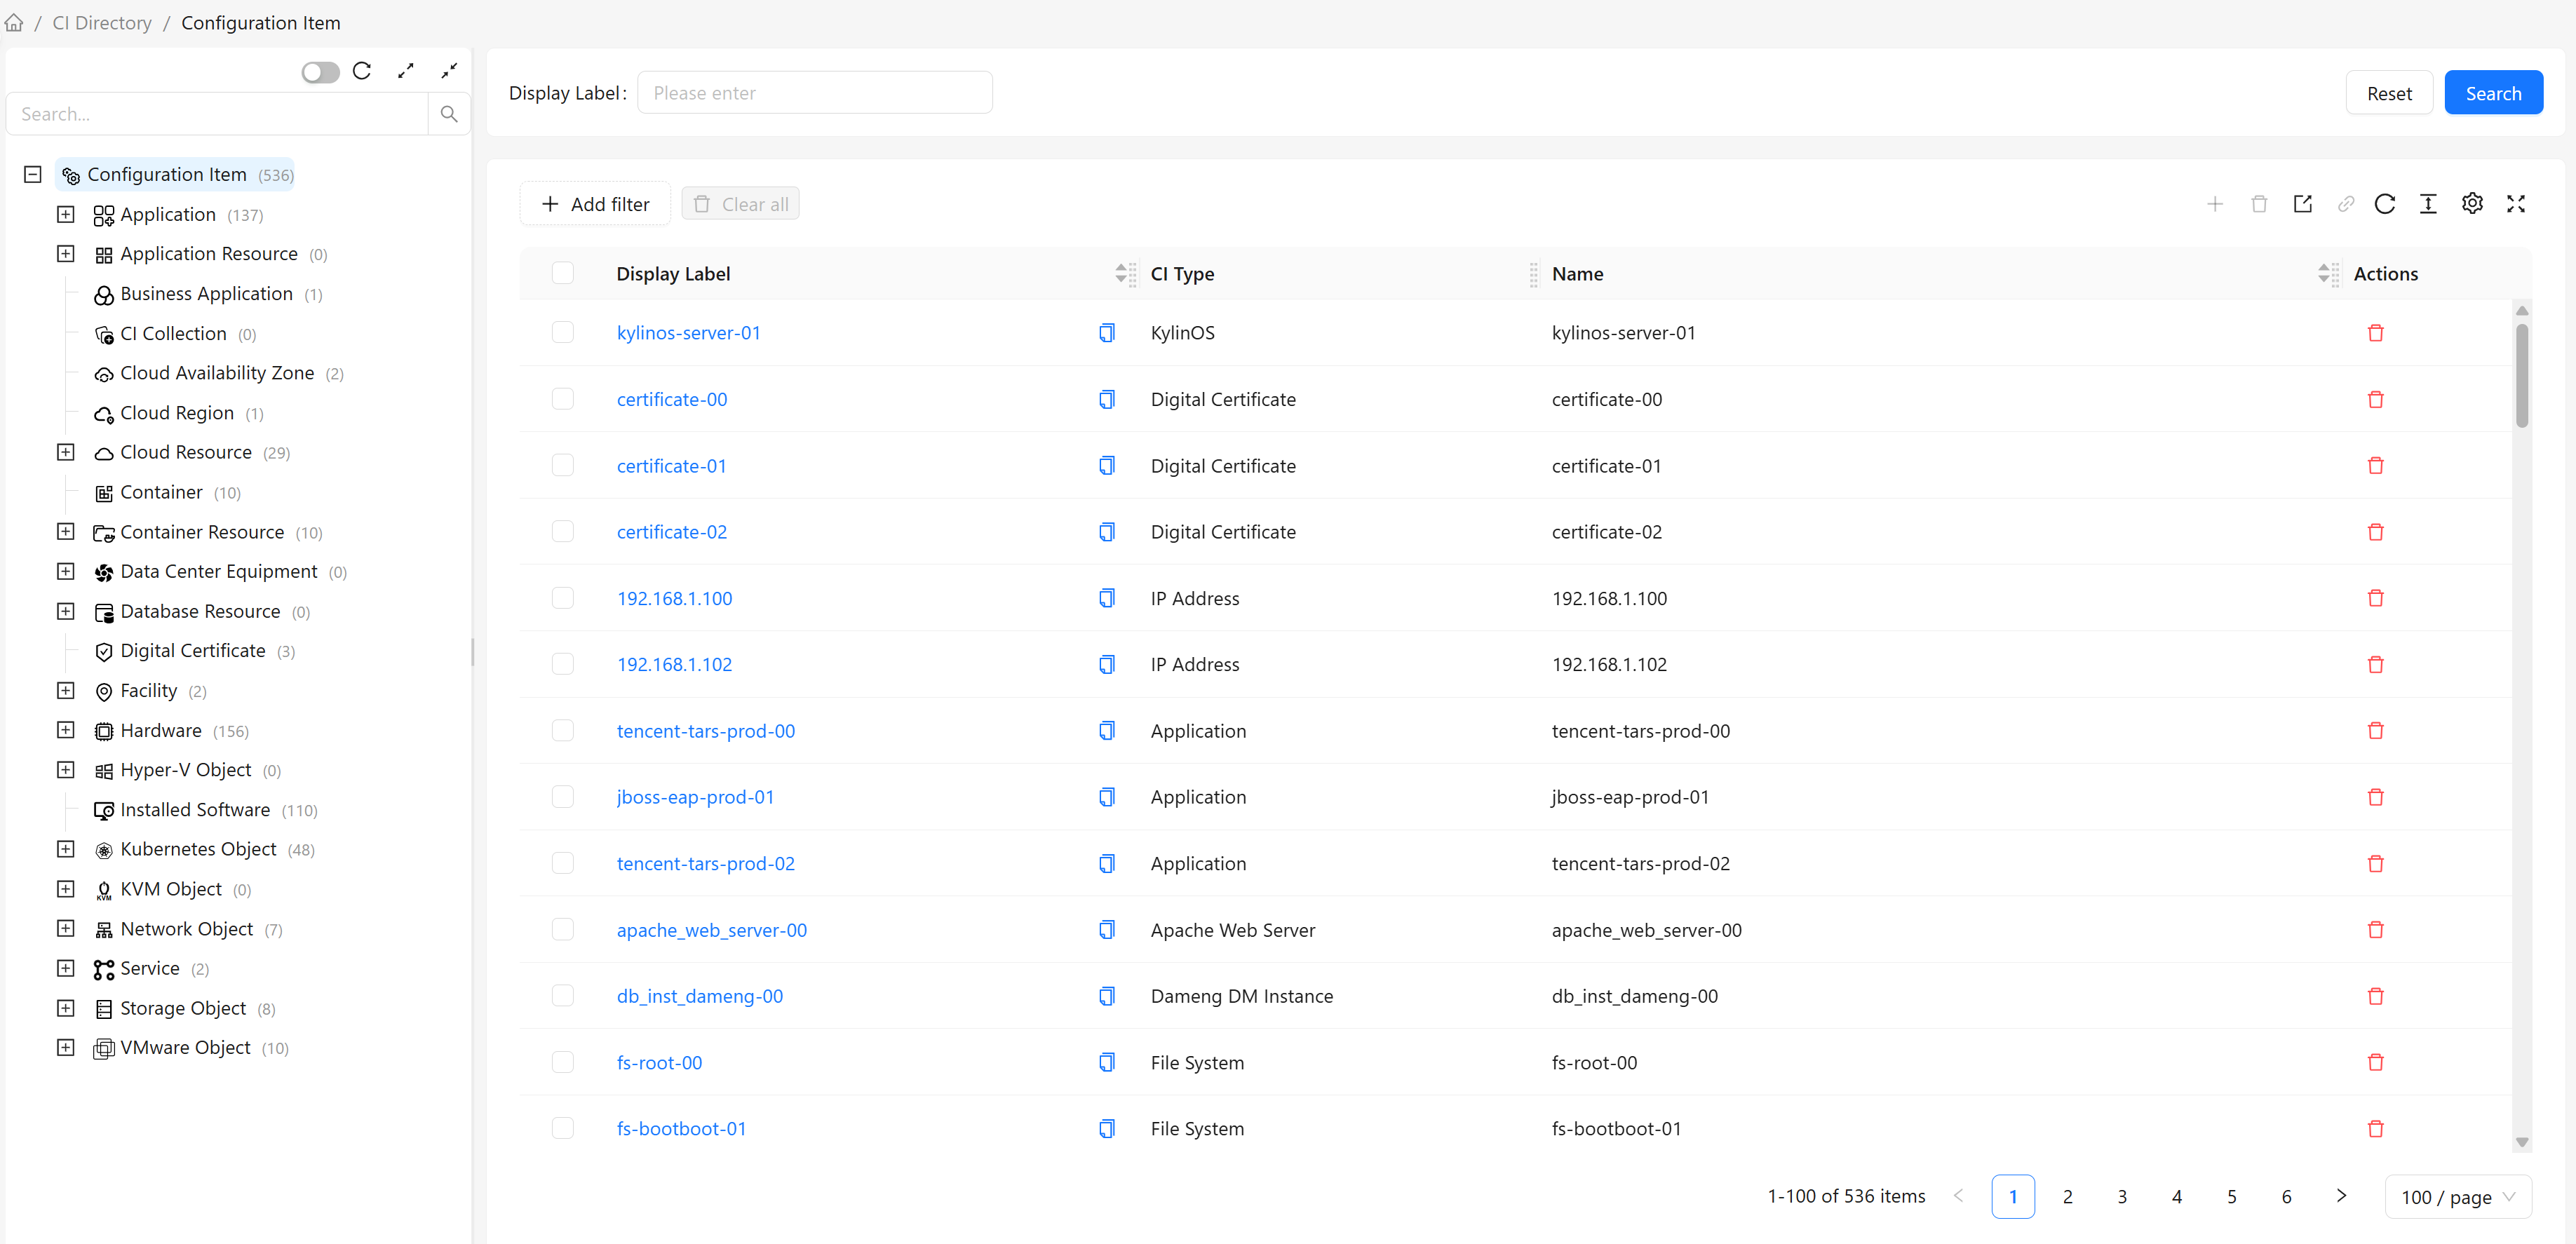
Left: CI Type Tree
The left panel displays the hierarchy of all CI types, supporting search, expand/collapse, hide empty types, and other operations. See Type Tree Features for details.
Right: CI Instance List
The right panel displays CI data for the selected type:
- Configuration Items: Displays corresponding CI attributes based on the selected CI type
- Advanced Filtering: Configure filter conditions to filter data
- CI Operations: Create, delete, and export CIs
- Column Settings: Customize displayed columns, table density, etc.
- Pagination: Supports paginated browsing of large datasets
How to Use
View the CI Instance List
- Select a CI type in the left type tree
- The right panel displays CI instances of that type
- Click a CI's display name to view details (navigates to the CI detail page)
Search CIs
Use the search box above the list:
- Enter the CI's display name in the search box
- The list automatically filters to show only matching CIs
- Clear the search box to restore all CIs
Filter CIs
Click the "Filter" button above the list to open the advanced filter panel.
Supported filter operators: Different data types support different operators. See Attribute Filter Configuration for operator details.
Create a CI
Single-step Creation (No Mandatory Dependencies)
Most CI types can be created directly:
- Select the CI type to create in the type tree. If the selected type is abstract, you must select a concrete subtype
- Click the "Create" button in the top toolbar
- Fill in the CI information
- Click "OK" to complete creation
Multi-step Creation (With Mandatory Dependencies)
Some CI types have mandatory dependency relationships and require multi-step creation:
Step 1: Select Associated CI
- Select the dependent CI (e.g., the
ComputerthatInstalled Softwarebelongs to) - The system automatically establishes the association
Step 2: Fill in CI Information
- Fill in the CI's attribute information
- Click "OK" to complete creation
Mandatory Dependency Examples:
Installed Software,Disk, andFile Systemmust belong to aComputerto be created (via theContainsrelationship)
Create Related CI
After selecting a CI row, click the "Create Related CI" button in the toolbar to create a new CI associated with it. The system will guide you through selecting the association type and filling in information based on the valid relationships defined between CI types.
Batch Operations
After selecting multiple CI rows, you can perform batch deletion to clean up unwanted CIs at once.
Export the CI Instance List
- Select the CI type to export in the type tree
- Optional: Apply filter conditions to filter data
- Click the "Export Current List" button in the top toolbar
- The system generates and downloads the export file
List Features
Column Configuration
Table columns are dynamically generated based on the attribute definitions of the selected CI type. Attributes are organized by groups (Basic, System, Other, Data Collection), with different default display states for different groups:
Default Visible Columns:
- Display Name: The CI's display name, always shown as the first column
- Type: The name of the CI type the CI belongs to
- Basic Attributes: All attributes in the "Basic" group defined for this type (excluding Display Name and Type, which are listed separately)
Default Hidden Columns (can be enabled via column settings):
- ID: The unique identifier of the CI
- System Attributes: Attributes in the "System" group (e.g., creation time, update time)
- Other Attributes: Attributes in the "Other" group
- Data Collection Attributes: Attributes in the "Data Collection" group
Note: Binary type attributes are not included in the above list, meaning such attributes cannot be displayed in the table. To view binary type attribute values, use the CI detail page.
For column operations (show/hide columns, adjust column order, pin columns, column width, sorting, toggle density, local persistence, and other common table operations), see Data Table Operations. Table preferences (column state, density, page size, filter conditions) are saved independently for each CI type — switching types will not overwrite another type's settings.
Common Scenarios
Scenario 1: View All Computers
Business Need: View a list of all computers in the system.
Steps:
- Expand the CI type hierarchy in the left type tree
- Select the Computer type
- The right panel displays a list of all computers
- Use the filter feature to narrow down computers by specific conditions
Scenario 2: Create Installed Software
Business Need: Add a new Installed Software record for a computer.
Steps:
- Select the Installed Software type in the type tree
- Click the "Create" button
- Step 1: Select the computer this software belongs to (mandatory dependency)
- Step 2: Fill in software information (name, version, etc.)
- Click "OK" to complete creation
Scenario 3: Export Production CIs
Business Need: Export all production environment CIs for backup.
Steps:
- Select the CI type to export
- Set filter condition:
Environment= "Production" - Click the "Export Current List" button
- Wait for the export to complete and download the file
Scenario 4: Find a Specific CI
Business Need: Quickly find CIs with "web" in their name.
Steps:
- Select the type that might contain the CI in the type tree
- Type "web" in the search box above the list
- The list automatically filters to show matching CIs
- Use the filter feature for further refinement
Type Tree Features
Node Selection
- Click a type node: Displays all CI instances of that type
- Instance Count: Displays the number of instances for each type
- Includes Subtypes: Instance count includes all subtype instances
Search
Use the search box at the top of the type tree:
- Enter a type name keyword
- The tree automatically filters to show matching types
- Clear the search box to restore all types
Refresh
Click the "Refresh" button at the top of the type tree to reload type tree data, useful when:
- Other users have added or modified CI types and you need to update the local type tree
- Type instance counts have changed and need updating
Expand and Collapse
Use the top buttons:
- Expand All: Expand all type nodes
- Collapse All: Collapse all type nodes
Hide Empty Types
Toggle the "Hide Empty Types" switch:
- On: Only show types with CI instances
- Off: Show all types (including empty types)
Frequently Asked Questions
Q: Why can't I create CI instances for some types?
A: These are abstract types. You can only create CI instances of their concrete subtypes.
Q: What are mandatory dependencies?
A: Some CI types must depend on other CIs to exist. For example, Installed Software must belong to a Computer. When creating such CIs, the system guides you to first select the dependent CI.
Q: How can I view CIs of multiple types at once?
A: CI Directory can only display CIs of one type (including its subtypes) at a time. To view multiple types:
- Select each type individually to view
- Use the CI List feature to create custom lists containing multiple types
- Use global search to search for CIs
Q: What format is the exported file?
A: The exported file is in CSV format, containing all CI data after current filtering.
Q: Are filter conditions saved?
A: Filter conditions are saved to browser local storage and automatically applied when you select the same CI type next time.
Q: How can I quickly locate a specific CI?
A: You can use the following methods:
- Use the search box above the list to search by name
- Use the advanced filter feature to set precise conditions
- Use global search to search across the entire CMDB
Q: Can I batch modify CIs?
A: The current version does not support batch modification. To modify multiple CIs, edit them individually.
Q: Is the "Hide Empty Types" setting saved?
A: Yes, the "Hide Empty Types" setting is saved to browser local storage and automatically restored on next visit.