CI Topology View Details
Overview
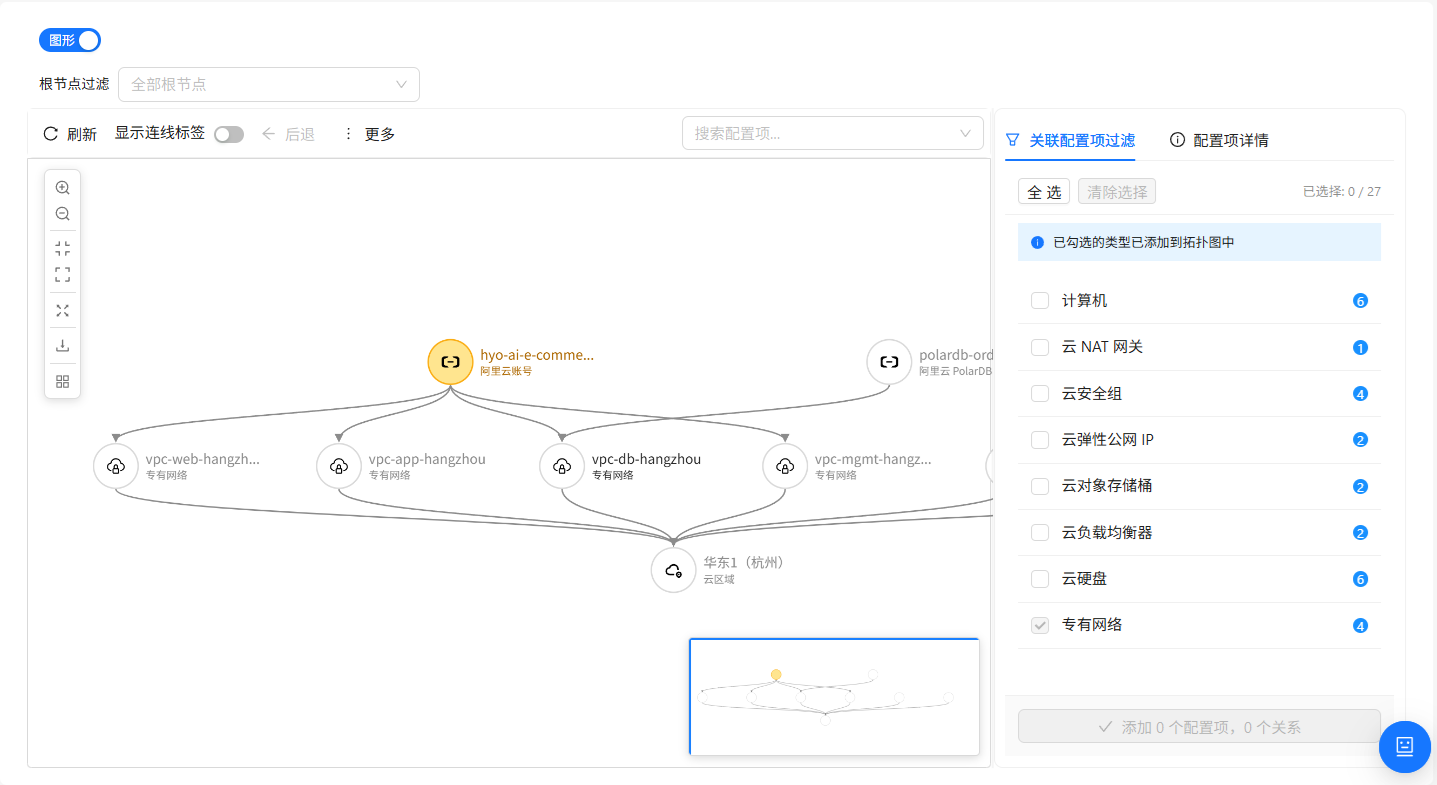
CI Topology View renders the relationship network between CIs based on the execution result of the selected query definition. The query definition determines which CI types appear in the graph and the relationship paths between them. It offers two view modes, toggleable with a single switch at the top:
- Graph View: An interactive relationship network. Common operations (canvas zoom and layout switching, node and edge interactions, Explore Mode, History Navigation, Node Limit, relationship maintenance, etc.) are documented in CI Topology; the Root Node Filter, specific to Topology View, is described in Graph View Specifics below.
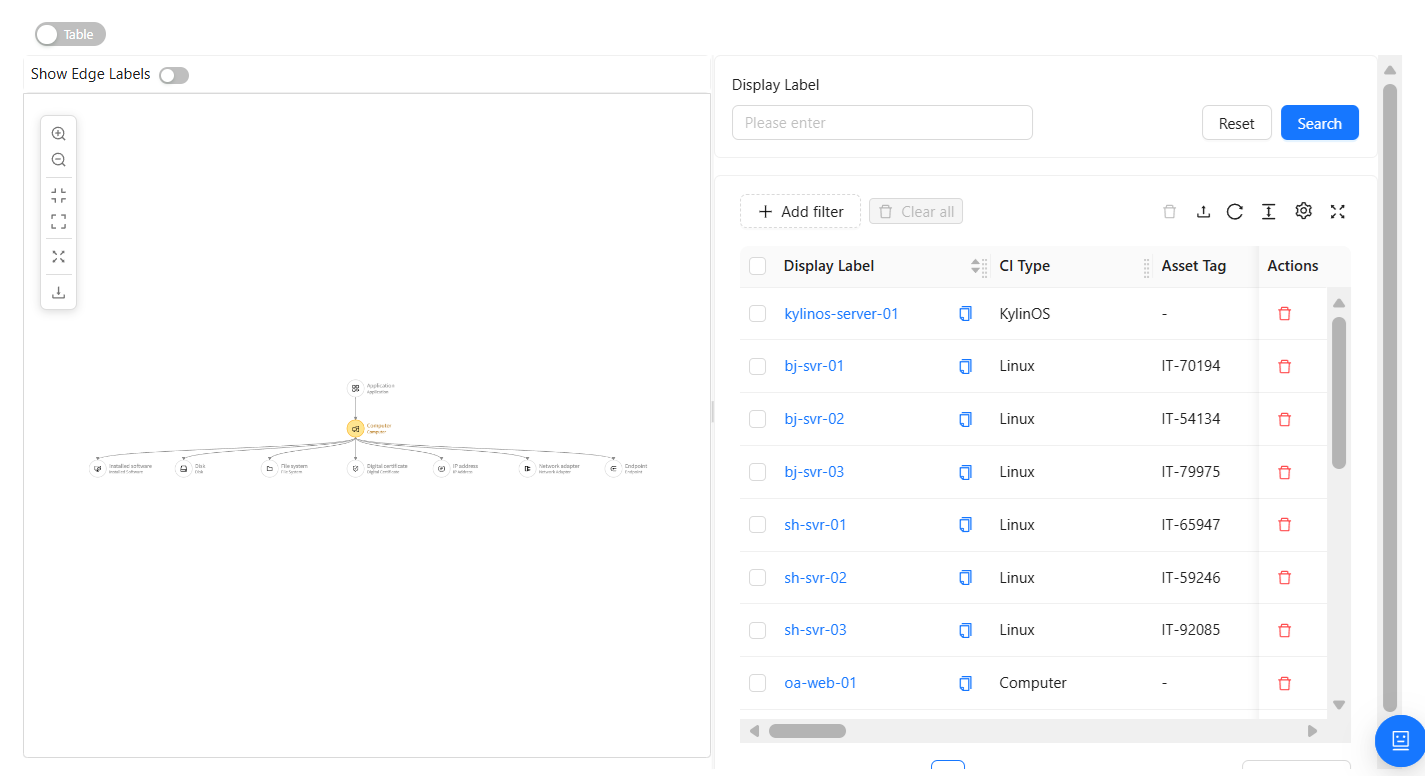
- Table View: A list of instances. Common operations for the right-side data table are documented in Common Data Table Operations; its left side is the topology-structure graph of the query definition (other modules' table views may differ on the left), fully described in Table View below.
Graph View Specifics
Root Node Filter
When the query result of the selected query is not empty, a Root Node Filter dropdown appears above the canvas. For more on root nodes, see Query Details — Query Root Node.
| Control | Purpose | When to use |
|---|---|---|
| Root Node Filter dropdown | Show only the partial topology starting from a specific root-node instance | When the graph is too crowded and you want to focus on the sub-topology rooted at a specific host or application |
| All Root Nodes (placeholder) | No filter — show the full topology expanded from all root nodes | The default state, when you need the full CI topology structure |
Steps:
- Click the "Root Node Filter" dropdown
- Enter or search for the target root-node instance in the dropdown (supports name filtering)
- After selecting an instance, the canvas renders only the topology rooted at that instance
- Clear the selection (or choose "All Root Nodes") to restore the full topology
Switching the root node filter clears the current history, selection state, and manually appended nodes — equivalent to reopening a new graph.
Table View
Overview
Table View is the alternative presentation of CI Topology View. It shifts the view from a "relationship network" back to "instance details": the left shows the topology-structure graph of the selected query definition (which type nodes and relationships it contains), and the right lists the CI instances of the selected type node.
Table View is well suited for:
- Cases where the topology has too many nodes and Graph View degrades or is truncated
- Precisely reviewing the specific attribute values of each CI type
- Exporting instance data of a particular CI type to a file
- Advanced filtering and sorting by attribute fields
Interface Layout
Table View uses a left-right split layout:
- Left: The query definition's topology-structure graph, showing which type nodes the current query definition contains and the relationships between them
- Right: The CI instance list for the selected type node
Left: Query Definition Topology-Structure Graph
The query-definition topology-structure graph is a "skeleton preview" of the current query definition: each node represents a type in the query (for example, Computer, Database), and each edge represents a relationship defined in the query (for example, "Database --runs on--> Computer").
Switch the Type to View
- Click a type node (for example,
Database) in the left structure graph - The right instance list switches to all CI instances of that type that satisfy the query conditions
- Click another node to switch to the instance list of the corresponding type
The topology-structure graph reflects the structural definition of the query, not live data. Nodes represent "which types this query involves" — the right-side list is where the actual instances live.
Right: CI Instance List
The right side shows the CI instance list for the currently selected type node as a fully featured data table. Common operations such as column management, advanced filtering, pagination, and density are documented in Common Data Table Operations. By default, the table shows the basic attribute columns of the type along with key columns such as "Display Name" and "CI Type"; other attributes can be turned on manually through column settings. Table preferences (columns, density, page size, etc.) are saved independently per CI type node.
Filter conditions in Table View are merged with the relationship structure of the current query definition and executed together. The instances shown in the right list satisfy both the query's relationship constraints and any ad-hoc attribute filters you have added — both are applied simultaneously.
Export Instance Data
Table View supports exporting the instance data of the current type node to a file:
- Select the type node to export in the left structure graph
- (Optional) Apply an advanced filter to narrow down to the desired instances
- Click the "Export" button in the table toolbar
- The system generates and downloads an export file based on the current query structure, selected fields, and filter conditions
During the export, a "Starting export..." prompt is displayed, followed by "Export complete!" when done. If the export fails, the reason is shown.
The export merges the current query definition with the fields, filters, and sort order you have chosen on the table, ensuring the exported data matches what you see on the screen.
Common Scenarios
Scenario 1: Switching from Graph View to Table View when there are too many nodes
Need: Graph View prompts "Graph data exceeds the maximum limit" and cannot render completely.
Steps:
- Toggle the view-mode switch at the top right to the "Table" end
- Click the type node you want to review in the left structure graph
- The right list shows all instances of that type — use pagination and filtering to locate the target
- Click "Export" to download the data for offline analysis
Scenario 2: Exporting a CI type filtered by relationship topology
Need: You need a list of "all computers depended on by the core business system" — only computers that the applications under that business system run on, not every computer on the network. This kind of "filter by relationship" requirement is exactly where the Topology View table shines: the CI List can only filter by a computer's own attributes (OS, environment tag, etc.), whereas Topology View can filter by the relationship structure in the query definition (such as "Application → runs on → Computer"), so the exported computers are naturally limited to those depended on by the applications.
Steps:
- Select the corresponding query definition (for example, "Core Business System Dependency Topology") at the top of Topology View
- Switch to Table View
- Click the
Computernode in the left structure graph — the right side lists the computer instances constrained by that topology relationship - (Optional) Layer on an attribute filter to further narrow the scope
- Click "Export" to download the list file
Scenario 3: Batch-verify attributes of a CI type within the topology
Need: While in Graph View you noticed that some computers along the "Application → runs on → Computer" chain may have insufficient memory or a non-compliant OS version. Now you want to pull all the computers involved in this topology into one table, compare them horizontally by memory, OS, and other fields, pick out the non-compliant instances, and then return to Graph View to investigate their upstream and downstream relationships.
Steps:
- Keep the current query definition unchanged and switch to Table View
- Click the
Computernode in the left structure graph — the right side lists the computer instances constrained by that topology relationship (rather than all computers on the network) - Use column settings to check "Memory", "OS Version", "Status", and other fields you need to compare, so you can compare them horizontally
- Sort ascending by "Memory" if needed, or add a filter condition (such as "Memory less than 8 GB") to quickly locate non-compliant instances
- Click a row in the table to jump to that CI's detail page and review its full attributes
- To further inspect the upstream/downstream relationships of a non-compliant instance, switch back to Graph View and use the "Search CI" dropdown in the toolbar to locate it and see its full topology
Table View and Graph View share the same query definition — switching between them does not lose context. The recommended workflow for this kind of question is to first use Table View for precise attribute review, then return to Graph View for relationship investigation.